I have to admit that seeing spring vegetables in the markets and local farm stands gets me all giddy. Spring and early summer are definitely my favorite times to cook. I mean just look at this array from our local farm, Sweetwater . . . hard not to be inspired.
I love it that this farm is 4 blocks from our house, yes we are so very fortunate to live in Northern California. This salad more evolved than was planned, a method that usually results in my favorite kitchen creations.
We had a few friends coming over for dinner and I wasn't really sure what I was going to make with these vegetables. I thought roasting them sounded good. So I drizzled them with a bit of olive oil and put them in the oven. When they were done, I pulled them out, and then, as happens a lot around our house, the kids wanted something, and then something else, which resulted in the baking sheet sitting on the the stove for a while. They cooled to room temperature and I tasted them, they were a mix of crispy, tender, sweet deliciousness. Which, by the way, if you have never had roasted radishes you have been missing out. The roasting mellows their bitterness and leaves this interesting spicy-sweet flavor.
True confession time, when I was a kid my family nicknamed me "bunny" since I was always eating rabbit food. Fortunately, my love of vegetables has endured, while the nickname has not! So, when our friend said of this dish ... "That's not a salad. That is a journey in vegetables!" I took it as a huge compliment. To dress the salad I made a roasted green garlic vinaigrette with Chardonnay Wine Vinegar from one of my favorite suppliers--Sonoma Harvest. For the recipe, head on over to Sonoma Harvest and check it out.
Thursday, June 5, 2014
Tuesday, April 1, 2014
Flour. Butter. Eggs.
You guys, do you know how amazing those 3 ingredients are? Add a bit of sugar--you can make sugar cookies, or madeleines, pound cake, or sponge cake. Add some milk--you can make waffles, crepes or éclairs!
Ponder for a moment the difference between crepes and éclairs, the same ingredients combined by different techniques--vastly different results. If you don't find that just a little bit thrilling, well then, heck, you are probably reading the wrong blog.
One of the first food blogs I ever started following was Love and Olive Oil. Blogger Lindsay Landis does a monthly "Kitchen Challenge", which I think is a brilliant idea. She has covered everything from bagels to the finicky french macarons. This month her cooking challenge is éclair.
Éclairs have been on my cooking bucket list for sometime and this post on the subject gave me that extra little push to go for it. Nothing like someone describing the challenges of a particular dish to make me want to try it.
From reading Love and Olive Oil, I know Lindsay loves cookie dough (She did author "The Cookie Dough Lover's Cookbook" after all.) So I thought hmmm, "What if you filled the éclair with a brown sugar, vanilla pastry cream studded with little cookie dough bites?!?!" And that's exactly what I did.
While there are a lot of steps in this recipe, I don't think it is particularly difficult. Frankly, it was more difficult for me to write the recipe than to actually cook it. Don't skip the sifting steps for the flour and the powdered sugar. It really helps produce a smooth dough and glaze, respectively.
Also, people tend to discuss pastry creams, and the like, as if a great big scrambled egg monster is going to rear up out of your saucepan at any moment. I have never once scrambled the eggs in a pastry cream, lemon curd, or crème anglaise. That is not because I have some cooking super-power--I am just not intimidated by it and there is no reason you should be either. The key is to simply warm the eggs up slowly, also known as "tempering".
I have a few tips that may help:
1) Use a heavy bottomed sauce pan. (Mine is an all-clad stainless steel one.)
2) Place a towel, rolled up like a doughnut, under the bowl you are going to be mixing into. This way it won't slide all over the counter while one hand is whisking and the other is slowly pouring in the hot liquid.
3) Use a ladle or small measuring cup to transfer the hot liquid. Controlling a small measuring cup is a lot easier than trying to drizzle slowly from a heavy pot.
4) After the eggs have been warmed and poured back into the pot, stir constantly. Really, don't stop gently stirring all around the bottom of the pan.
5) Lastly, don't worry about making a mess. I always drip all over the counter and stove, but hey, that's what sponges are for.
Incidentally, the pâte à choux in this recipe can be used to make profiteroles, beignets, or gougères.
Thank you for the inspiration Lindsay. I can't wait to see what the May Kitchen Challenge is ...
![]() |
| Crepes image available at: http://tinyurl.com/ps3qeq2 Éclairs image available at: http://tinyurl.com/248xqrm |
One of the first food blogs I ever started following was Love and Olive Oil. Blogger Lindsay Landis does a monthly "Kitchen Challenge", which I think is a brilliant idea. She has covered everything from bagels to the finicky french macarons. This month her cooking challenge is éclair.
From reading Love and Olive Oil, I know Lindsay loves cookie dough (She did author "The Cookie Dough Lover's Cookbook" after all.) So I thought hmmm, "What if you filled the éclair with a brown sugar, vanilla pastry cream studded with little cookie dough bites?!?!" And that's exactly what I did.
While there are a lot of steps in this recipe, I don't think it is particularly difficult. Frankly, it was more difficult for me to write the recipe than to actually cook it. Don't skip the sifting steps for the flour and the powdered sugar. It really helps produce a smooth dough and glaze, respectively.
Also, people tend to discuss pastry creams, and the like, as if a great big scrambled egg monster is going to rear up out of your saucepan at any moment. I have never once scrambled the eggs in a pastry cream, lemon curd, or crème anglaise. That is not because I have some cooking super-power--I am just not intimidated by it and there is no reason you should be either. The key is to simply warm the eggs up slowly, also known as "tempering".
I have a few tips that may help:
1) Use a heavy bottomed sauce pan. (Mine is an all-clad stainless steel one.)
![]() |
| Image available at: http://tinyurl.com/nql9fp5 |
![]() |
| Image available at: http://tinyurl.com/qgacwq2 |
4) After the eggs have been warmed and poured back into the pot, stir constantly. Really, don't stop gently stirring all around the bottom of the pan.
5) Lastly, don't worry about making a mess. I always drip all over the counter and stove, but hey, that's what sponges are for.
Incidentally, the pâte à choux in this recipe can be used to make profiteroles, beignets, or gougères.
Thank you for the inspiration Lindsay. I can't wait to see what the May Kitchen Challenge is ...
Friday, March 7, 2014
Necessity and Pancakes
They say Necessity is the Mother of Invention, but I would also say that Invention is the Necessity of Mothers! Preparing truly nutritious meals for kids that are appealing, quick, and easy, can be a challenge (to say the least). It makes me ever so grateful for things like, oh I don't know ... a refrigerator, a blender, and a dishwasher!
Moms (and Dads) have come up with many great tricks, tips, and schemes to take care of their families. These days we are also fortunate to have the Internet, where we can share all these ideas. I saw this recipe for Cottage Cheese Pancakes on Super Healthy Kids a couple of weeks back. It appealed for being high-protein and whole-grain and wheat-free. Added bonus, it was also super simple, and quick, which made it feasible for a school morning.
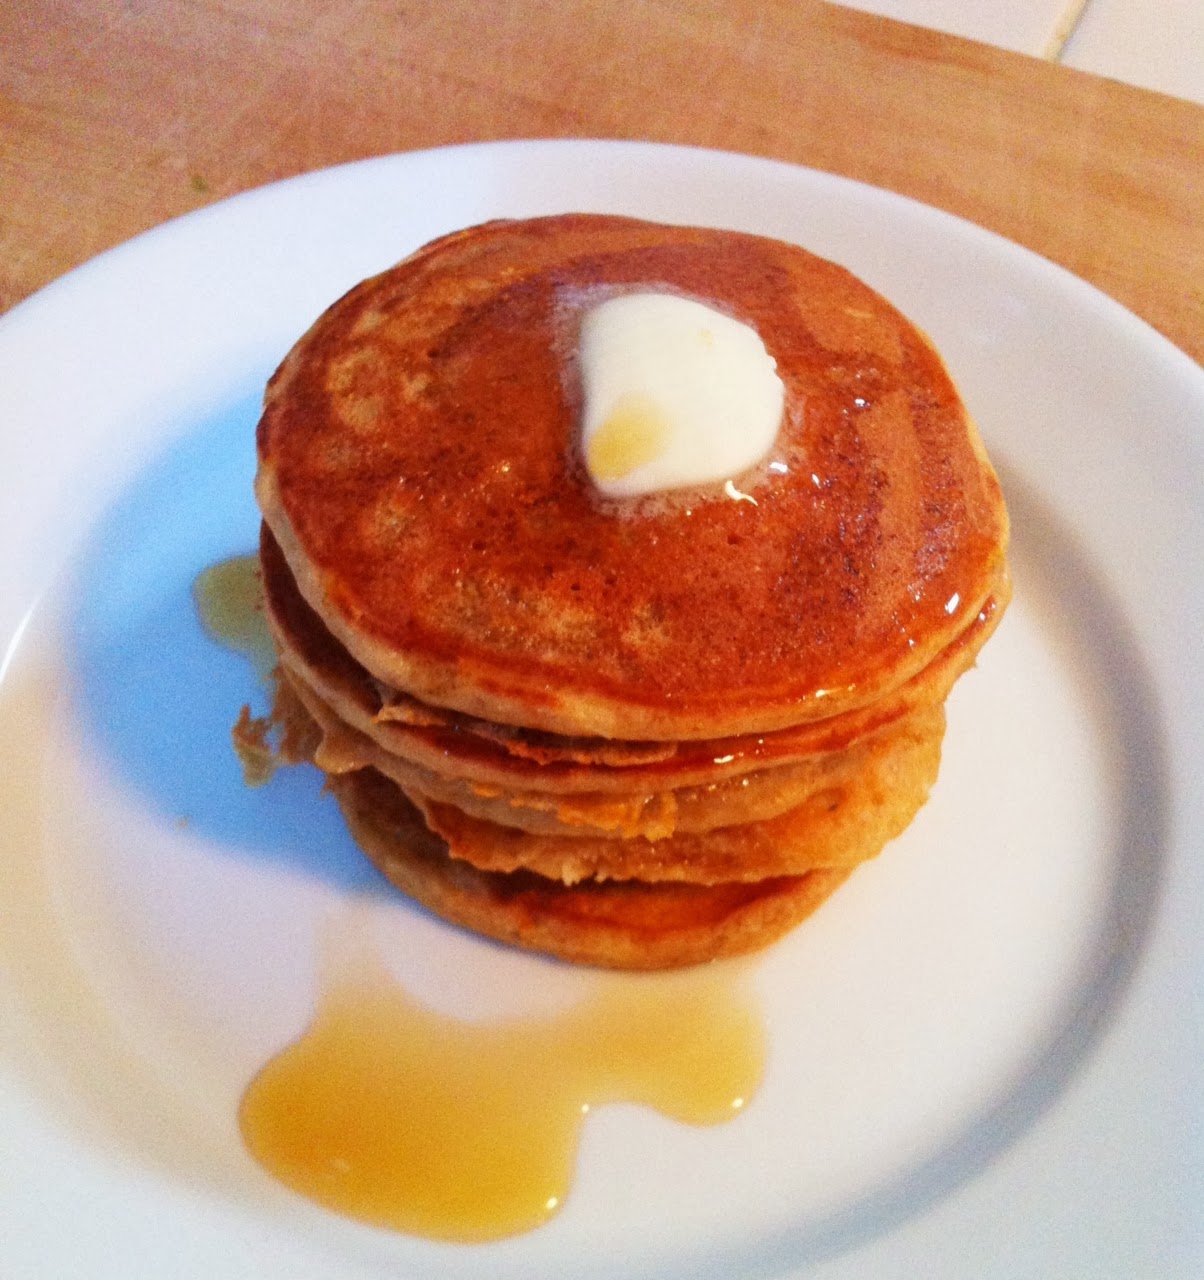
I got up this morning and realized that our breakfast choices were, Cheerios, or ... Cheerios ... I figured I'd give it a go. I blended up a batch exactly as the recipe indicated (with a touch more cinnamon). I drizzled them with a little local honey, and the girls were very happy. I thought they were tasty too, but, a bit too flat, and dense ... Hmmm ...
Then there were some that called for whipping the egg whites separately ... which would be great for lightening the texture, and a fine idea for a Sunday morning. But on a school morning? No way in "h-e-double hockey sticks" am I going to be separating eggs, pulling out the Kitchen Aid, and tenderly folding the batter on a Wednesday. I'll be lucky if both kids make it to school without a memory they'll share with their therapists decades from now.
So I thought, what else can we use to make more bubbles in the batter? Perhaps a dash of baking powder? I pulled the baking powder out of the pantry ... and this was staring right at me:
Oat flour instead of whole oats? Well sure, why not? I put everything in the blender, turned it on, and was ready to go in less than 5 minutes. Guess what? They were great! Nice little bubbles formed, the crumb was smooth and tender, and as an unexpected benefit, the oat flour really upped the oat flavor.
These are great drizzled with a little honey, or spread with a bit of jam. I could just as easily see making a savory version rolled up with a slice of ham and swiss cheese.
Monday, January 27, 2014
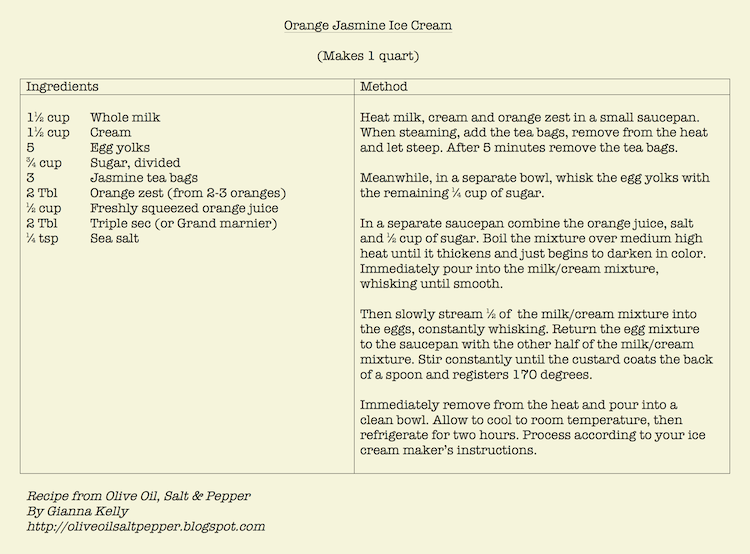
Jasmine Orange Ice Cream
![]() |
| Jasmine Orange Ice Cream |
A perfect example of what I wrote about previously, this recipe was created because a bunch of beautiful local oranges fell into my lap, so to speak. We were at our good friends' house this past weekend, and they had this amazing orange tree, loaded with oranges. And they asked me what the heck they should do with all those oranges ...
So I googled how to use oranges, because, well, I'd had a glass or two of wine, and we were watching football, and I wasn't feeling particularly creative at that moment. I found this, and this, and then I found this recipe for jasmine orange cupcakes. Jasmine and orange is a brilliant combination, and not only because the smell of jasmine reminds me a lot of the scent of orange blossoms.
![]() |
| Orange blossoms and jasmine blossom. Images available at: http://tinyurl.com/5qbx6 |
I let that jasmine-orange idea sit in my head overnight. And then I thought . . . ice cream! Aside from emotional chemistry, there is quiet a bit of actual chemistry involved in this (and all) ice cream making. Frankly, ice cream is a rather fantastic structure of air, ice, fat, and sugar.
![]() |
| Ice cream under the microscope (From Clarke, 2012, “The Science of Ice Cream” Physics Education 38 (3)) |
There is a fun article on the science of ice cream at Ice Cream Nation if you'd like to read more. And if you'd rather just eat ice cream instead . . .
Monday, January 20, 2014
Appreciating What We Have.
| Grapefruit Tart with Earl Grey Cream |
It is a similar ethos to locavorism and seasonalism. But for me, it goes deeper than that -- for me it is also a metaphor for life. Noticing and appreciating what is right in front of me. Letting what is present on any given day inspire me, and allow me to connect more fully with myself and my family and friends.
This week the inspiration was grapefruit. It's a lovely, bright, and sunny inspiration. My folks dropped off a big bag of grapefruit from their friend's farm. I had a lot of ideas -- grapefruit avocado salad, grapefruit pound cake, winter citrus salad ... and then this . . . Grapefruit Tart with Earl Grey Cream.
Now, it may look like I, as a 49ers fan, making a red-and-gold tart today is some kind of a message. It isn't! Football, like cooking, can be sweet and savory, or sour or bitter. The sign of good cooking isn't in the flavor -- if it were, we'd eat nothing but milkshakes. It's the response to, and understanding of, our environment, of where and when we live, that makes the craft into an art, and makes us enjoy what we find right in front of us ...
Monday, January 13, 2014
Ode to Coconut and, a Bit of Kitchen Chemistry
Toasted Coconut Pancakes . . . I know I had you at toasted. We love pancakes in our house, and I find it easy to make pancakes that are delicious and also pack in a lot of nutrition.
For these pancakes I use shredded coconut, coconut sugar, coconut milk and coconut oil. You know what they always say, "Go coconut, or go home!"
Holding all that coconut together are whole grain flours, a touch of almond extract (I find it enhances the coconut flavor), and buttermilk. The buttermilk is important. It plays a vital role in making a fluffy pancake with a tender crumb. Why? Because of its acid content.
Quick breads, things like pancakes and muffins, owe their rise to a bit of simple chemistry. It is the same reaction that produces those science fair "volcanoes". The reaction of Sodium bicarbonate (baking soda) and acid. Combine baking soda, and vinegar (or lemon juice, or buttermilk), and you get Carbon dioxide and water. The Carbon dioxide gas gets trapped as bubbles in the batter resulting in light airy pancakes.
There is not much point in adding baking soda to a batter that doesn't have any acid in it. It won't have anything to react with. If you're batter doesn't call for an acidic ingredient, baking powder will be your leavening agent. Baking powder is baking soda with the acid already added, usually in the form of potassium bitartrate, also known as "cream of tartar". In fact, if you run out of baking powder, you can substitute baking soda with the addition of vinegar, lemon juice, or cream of tartar.
Ok, back to the toasted coconut. Do you know how good coconut smells when it is toasting? Crazy good! I seriously adore it. To start making these pancakes, set your broiler to low. Spread shredded coconut in a thin, even layer on a baking sheet. Set it on the middle rack of the oven. Then just stand there.
I know, it's hard to just stand there and not start doing other things. Trust me it's worth it. Think of it as a few minutes of meditation; be fully present in the moment, with your coconut. You will be rewarded for your efforts by a greater sense of calm, and the amazing smell of perfectly toasted coconut. You want it just the softest shade of brown. It should look a lot like the latte you are drinking.
Now that you are in coconut heaven, let the coconut cool while you mix the rest of the ingredients for your pancakes. Then enjoy (with your latte of course)!
| Toasted Coconut Pancakes |
Holding all that coconut together are whole grain flours, a touch of almond extract (I find it enhances the coconut flavor), and buttermilk. The buttermilk is important. It plays a vital role in making a fluffy pancake with a tender crumb. Why? Because of its acid content.
Quick breads, things like pancakes and muffins, owe their rise to a bit of simple chemistry. It is the same reaction that produces those science fair "volcanoes". The reaction of Sodium bicarbonate (baking soda) and acid. Combine baking soda, and vinegar (or lemon juice, or buttermilk), and you get Carbon dioxide and water. The Carbon dioxide gas gets trapped as bubbles in the batter resulting in light airy pancakes.
There is not much point in adding baking soda to a batter that doesn't have any acid in it. It won't have anything to react with. If you're batter doesn't call for an acidic ingredient, baking powder will be your leavening agent. Baking powder is baking soda with the acid already added, usually in the form of potassium bitartrate, also known as "cream of tartar". In fact, if you run out of baking powder, you can substitute baking soda with the addition of vinegar, lemon juice, or cream of tartar.
![]() |
| Image source: http://tinyurl.com/mlmwq2n |
I know, it's hard to just stand there and not start doing other things. Trust me it's worth it. Think of it as a few minutes of meditation; be fully present in the moment, with your coconut. You will be rewarded for your efforts by a greater sense of calm, and the amazing smell of perfectly toasted coconut. You want it just the softest shade of brown. It should look a lot like the latte you are drinking.
Now that you are in coconut heaven, let the coconut cool while you mix the rest of the ingredients for your pancakes. Then enjoy (with your latte of course)!
Monday, December 30, 2013
Amazing Birthday Blueberry Muffins
Whew! With a birthday party and Christmas preparations now complete, I feel like we are all taking a deep breath. Our Christmas day was peaceful and lovely, and I hope yours was too.
Our oldest recently turned 6 and we asked her if she'd like to plan her special day. From what to have for breakfast, to what activities the family would do, she picked her favorite things. It was both fun and endearing. Her first request was blueberry muffins for breakfast.
With all the holiday indulgences I wanted to serve a very nutritious muffin, but of course it also had to be delicious and feel special for her special day. Then of course, we are in December, pretty much the opposite side of the year from fresh blueberry season in Northern California. I picked up some frozen organic blueberries. A bit leery of them releasing too much moisture into the batter, I thawed them (just by leaving them out in a bowl on the counter top) and then gently patted them dry with paper towels.
For extra blueberry-ness, I used a special blueberry infused honey, compliments of Sonoma Harvest. If you don't have this, any good local honey will work.
The second trick to these muffins is ripe bananas--blended well. A while back I made banana crepes (which were incredibly tasty). When you prep the batter for banana crepes, you blend the banana, eggs, flour and milk together with an immersion, or stand blender until the mixture is totally smooth. I have since employed this strategy whenever baking with bananas. I love this technique because you get all of the banana nutrition and natural sweetness, with out those little chunks or brown stringy bits that pop up in your banana baked goods when you just mash with a fork. Now if you're into banana chunks, but all means go for it. But for these muffins the perfectly blended bananas work wonders.
All I have to say, is mission accomplished! These muffins had loads of blueberries, held together by a 100% whole grain, refined sugar free batter.
A note about the recipes: you probably noticed that I changed the format of my recipe display here. While cooking over the holidays, and usually using an iPad to reference my recipe, it was constantly bugging me that I was scrolling up and down between the ingredients and the method. It leads to either a rather messy iPad, or attempting to scroll with my elbow, which never works well. I came up with this side-by-side orientation in the hopes that you can view all the essential information at tonce. I'd love your feedback on the best way to view recipes, well actually I'd love any feedback at all :-)
Friday, December 13, 2013
A Milk & Honey Giveaway!
It's an exciting day--our first giveaway. I have mentioned Milk & Honey Ice Cream before, a small batch ice cream company that utilizes seasonal, local ingredients. Their ice cream is made only from all the good stuff: organic cream, eggs and evaporated cane juice -- that's it, no stabilizers or other strange ingredients.Their Rum Ginger Caramel Ice Cream was amazing! My Pear & Butternut Squash Pie was delicious, but that ice cream took it over the top into the completely, utterly fabulous realm. Well, today, you get a chance to win two pints of Milk & Honey Ice Cream! Cool, right? (Seriously, no pun intended.)
Brittaney is the talent behind these wonderful ice creams. She's a local Sonoma mom, and all around great gal, and has graciously offered to host a giveaway here. You can enter to win a pint of each of this month's flavors, and they sound fabulous:Eggnog: Straus organic cream and milk, Hooker House bourbon and cognac with a touch of winter spices.
Chocolate Chip Candied Orange: Straus organic cream and milk, homemade candied organic orange and chocolate chips with swirls of silky chocolate sauce.
I am also going to include a jar of my homemade Salted Caramel Sauce, just in case you want to "gild the lily." With just 4 ingredients, organic cream, butter, cane sugar, and sea salt, it is completely delicious drizzled over ice cream, cakes, or folded into marshmallows. More to come on that . . .
So, how to enter? You need not be local to win -- I will pack it up appropriately and FedEx it anywhere in the United States. Sorry, Australian readers, no international shipping yet.
Step (1) Like Olive Oil Salt & Pepper on Facebook.
Step (2) Like Milk & Honey on Facebook.
(If you are already a fan, yay! Just go to Step (3).)
Step (3) Then leave a comment on the Olive Oil Salt & Pepper Page on Facebook letting us know the ice cream flavor you'd most like to try!
For an extra entry, just share this Facebook post and we will add your name to the drawing again.
The winner will be selected on Wednesday, December 18th.
Tuesday, December 10, 2013
Persimmon Posibilities
I have been in a bit of a cooking slump. I think it was a the Thanksgiving preparations, Christmas preparations, and having a nasty cold. Frankly, I was starting to worry a bit that I wasn't going to feel that burning desire to create something in the kitchen.
Fortunately, I AM BACK! Due in no small part to this inspiring post at Abi's Farmhouse Kitchen. In the last 24 hours, I made yeast raised waffles--wow! Salted caramel marshmallows--amazing! And, this awesome persimmon pork dish.
It seems this year has yielded a bumper crop of persimmons in Northern California. Some dear friends gave us a huge box full of Fuyu persimmons from the tree in their yard and told us they don't really care for them. Even my brother, who is a chef, says they are not high on his list. However, I think persimmons, Fuyu persimmons, are underrated, (and clearly my daughter agrees as she just ate 5 of them). And, I am willing to bet I get can my brother and our friends to love persimmons.
I dreamed up an entire persimmon menu, think of an Iron Chef episode with persimmon as the secret ingredient.
Persimmon Lavender Shrub Cocktails
It seems this year has yielded a bumper crop of persimmons in Northern California. Some dear friends gave us a huge box full of Fuyu persimmons from the tree in their yard and told us they don't really care for them. Even my brother, who is a chef, says they are not high on his list. However, I think persimmons, Fuyu persimmons, are underrated, (and clearly my daughter agrees as she just ate 5 of them). And, I am willing to bet I get can my brother and our friends to love persimmons.I dreamed up an entire persimmon menu, think of an Iron Chef episode with persimmon as the secret ingredient.
Persimmon Lavender Shrub Cocktails
Persimmon Carpaccio with Burrata and Shaved Fennel
Bresola wrapped Persimmons and Arugula
--
Roasted Pork Tenderloin with Caramelized Persimmons and Kalamata Olives
Salad of Shaved Brussel Sprouts and Kale with Warm Pancetta Persimmon Vinaigrette
--
Eggnog Ice Cream with Persimmon Salted Caramel Sauce
Friends, (you know who you are), you will be called upon give some or all of these ideas a taste!
Wednesday, November 27, 2013
Thanksgiving Tour -- Bringing It All Together
I am having a hard time believing that tomorrow is Thanksgiving. It seems like a week ago that the kids were just going back to school. I am also having a hard time believing that I still have two recipes to post!For the Thanksgiving salad, Fuyu persimmons and Bosc pears are tossed with a blood orange vinaigrette and topped with toasted almonds and pomegranate seeds. It's simple and lovely. No blood orange olive oil on hand? No problem, just use another excellent extra virgin olive oil.
You could substitute Fuji or Gala apples for the pears, but please make sure to get the Fuyu and not Hachiya persimmons. The Fuyu are firm, shaped somewhat like a doughnut, and much tastier to eat straight out of hand.

And last, but certainly not least, the stuffing (or dressing). On day one of this adventure I posted about the Wild Rice and Roasted Squash Salad. I also promised that I would transform those same ingredients into the stuffing.
When I made the stuffing I used the leftovers from the Wild Rice Salad, added toasted baguette cubes, cranberries, walnuts and some fresh chicken stock. It was delicious. I have written the recipe up for you here from scratch since I am figuring you may want to make this and don't have the Wild Rice Salad in your fridge.
On a final note, thank you for reading, sincerely thank you! This is my 18th post in 35 days. That's a lot of blogging. And now, I think I am going on a hiatus, for a few days anyway. . .
Tuesday, November 26, 2013
Pear & Butternut Squash Pie
Recently, a local mom launched her Milk & Honey ice cream business. When she announced one of this month's flavors, Rum Ginger Caramel, a couple of weeks ago I started imagining pies to go with it. And that is how the Pear & Butternut Squash Pie was born. The pie was totally sublime with the ice cream.Now I realize not everyone has Rum Ginger Caramel ice cream in their freezer. So we tested the pie with good quality vanilla ice cream as well. (You know, purely for science, we had to make sure it was still good!) You could also make a rum caramel sauce to swirl with some regular vanilla ice cream from the store.
![]() |
| Sliced squash. |
Now about the crust, I used leaf shaped cookie cutters to create the top crust, but you can also cut them out with a pairing knife, or make a lattice pie crust. I made the crust with white whole wheat flour, but all purpose flour works fine to of course. If this is your first foray into pie crust making, it is not difficult, but I do have a few helpful tips. There are some nice tips, with pictures, here as well.
- Don't over process the dough, you want to mix only until the dough just begins to form a ball.
- Let the dough rest for 30-60 minutes after you've mixed it.
- The dough is easiest to roll out and handle when it is cooler than room temperature, not cold though.
- Don't be afraid of using plenty of flour when you are rolling out the dough. You can always brush off any excess.
- You can make the balls of dough ahead and refrigerate, or freeze, until you are ready to use, allow the dough to warm before rolling out.
- When the dough is rolled out and in the pie plate keep it cool. I return it to the fridge whenever I am not working with it.
Happy baking, and, stay tuned for a Milk & Honey giveaway here next month!
Sunday, November 24, 2013
Butterscotch Pie, Version 2.0
![]() |
| Image of pie available at: http://tinyurl.com/m2rmx29 |
So I decided to go to work on that recipe, and, let me tell you, I have changed my opinion -- this one will make it to our Thanksgiving spread. I started with modifying the texture. The first pie was too much like Jell-o for my taste. I upped the cornstarch, and decreased the gelatin, and voilà, much nicer mouthfeel. Secondly, I got rid of the molasses -- the caramelized sugar and brown sugar were plenty flavorful, and, I added whiskey, because heck, why not?
Now, about the crust. The crust is a big deal, it is what takes a kind of straight up custard pie and makes it interesting. And, while the curry in the crust was a great idea, I didn't want to hit diners over the head with it. I was hoping for more of a subtle, mysterious flavor that would make you go "Hmmm, what is that deliciousness?" I decreased the curry and the butter in the crust (there was way, way too much butter as the recipe was originally written). I also left out the sugar in the crust entirely. You use vanilla wafer cookies to make the crumbs -- given that these are already sweetened, I thought it unlikely the crust needed more sugar.
Disclaimer: this is not an easy recipe. It involves caramelizing sugar, and making a cooked egg custard on the stove -- arguably two of the more difficult techniques in cooking. But please, don't let this dissuade you from giving it a try. Whether it turns out perfectly, or gets messed up, you will learn a lot (which is fun!), and you might just end up with something of a showstopper on your Thanksgiving dessert table.
Friday, November 22, 2013
Thanksgiving Tour Continues
We continue today with a vegetable side dish, my favorite part of the menu, except for perhaps the pie.I love this recipe because it is simple, fresh, and if you've never had sautéed snap peas, well then you are in for a treat. For the olive oil in this dish I used a basil infused oil, but any very good quality oil will do.
As far as timing goes, this is the one dish you should really do à la minute. Begin this dish 15 minutes before you are ready to sit down. Then all that's left to do is carve the turkey and serve.
I love getting things done ahead, so below is a sample schedule I have sketched out of the cooking preparation.
Sample Preparation Schedule
2 days before -- Make stock.
1 day before -- Make cranberry sauce, make pie crusts, cube bread for stuffing, rub the turkey.
Morning of -- Make pies, assemble gratin (cover and refrigerate), assemble stuffing (cover and refrigerate), set out ingredients for vegetables.
3.5 hours before -- Start roasting turkey (2.5 hours for 14 lb, if your bird is larger, back up the start time accordingly).
2 hours before -- Make gravy base, make salad dressing.
1 hour - 45 minutes before -- Take turkey out of the oven to rest, bake gratin and stuffing, finish gravy.
15 min before -- Assemble and dress salad, make Peas and Carrots, carve turkey.
ENJOY!
Thursday, November 21, 2013
Thanksgiving Tour -- Turkey
With one week until Thanksgiving this seems like the perfect time to "talk turkey." There are probably as many ways to cook turkey as there are . . . well I don't know what, but there are lots of ways to cook your turkey: grill, fry, smoke, brine, stuff, even, God forbid, microwave.The thing is that a lot of these techniques are, frankly, a pain in the ass. I mean, to wet brine your turkey, you've got to get a big cooler, sanitize it, fill it, and go through a lot of hassle. You can purchase special turkey roasters. Heck, you can even buy an indoor turkey fryer for the low, low price of $209.99.
As I have mentioned before, simplicity and minimalism are important to me. Less is more, and all that. I was going to go ahead and cook a turkey specially for this post, to try to develop one of those other techniques mentioned above. But Thanksgiving is about tradition and gratitude. So I am grateful for my simple regular kitchen oven, and classic roast turkey.
![]() |
Image available at: http://tinyurl.com/k5dea9t
|
May your Thanksgiving be peaceful, simple, thankful and tasty!
Friday, November 15, 2013
Stocks Are Rising
Yes, the market is up today, but I am not talking about those kind of stocks. I am talking about homemade chicken, turkey or vegetable stock. I cannot emphasize enough how much better fresh stock is compared to the canned or boxed stuff they sell in the grocery store. It is about one hundred million times better. I wish I could invite each of you over to my house to do a taste test. Seriously! But, I can't. The fire marshal said he'd get a court order if I tried that again. So, you are going to have to trust me.
I know it is a generally accepted practice to use Swanson Chicken Broth to make soup, sauces, or to add to your Thanksgiving stuffing. However, whatever you are making will be vastly better with homemade stock. Even some of the "better" brands such as Pacific Free-Range Chicken Broth just can't compete with homemade.
You will see that many times the words "broth" and "stock" get used somewhat interchangeably. And that is kind-of alright, since usually you can interchange them in recipes. The main difference between the two comes down to the ratio of meat and bones that are simmered. Broths result from simmering mainly meat, sometimes on a few bones. Stocks are simmered bones, sometimes with a little meat on them. So the short version: broth from meat, stock from bones.
The result is that stocks will be more full bodied, both in flavor and in texture. When they cool, you will see that they thicken considerably from the natural gelatin in the bones. But it really is all on the same spectrum, like Fifty Shades of Grey ...
So how do you go about making your own stock. Well first of all, it is easy and there is a lot of leeway. You can add carrots and celery ... or not. You can add a bay leaf and peppercorns ... or not. You can simmer it for 2 1/2, or 3 hours, or 4 hours. You can even make it in a crock pot.
I usually just pick a Sunday afternoon that I am going to be around the house anyway, and make it in my stock pot which you can borrow if you want (and are willing to pay shipping and handling -ed.). Here's what you need:
1) Approximately 4 lbs of chicken, or turkey, wings.
2) Approximately 16 cups (4 quarts) of water.
3) 1 large yellow onion quartered.
4) 2 garlic cloves, unpeeled.
5) Optional--3 medium carrots, washed and cut into 2 inch pieces.
6) Optional--6 medium celery ribs, washed and cut into 2 inch pieces.
7) Optional--2 bay leaves.
8) Optional--1 teaspoon whole black peppercorns.
![]() |
| Image available at: http://tinyurl.com/m58q5bn |
Place everything in your large stock pot and bring it to a boil. Reduce the heat to a low simmer, and simmer for approximately 3 hours. Periodically skim off any foam or particles that accumulate on the surface. When you're done simmering, allow it to cool to room temperature. Pour it through a fine sieve, or a strainer lined with a couple of layers of cheesecloth.
There are a lot of recipes for vegetable stock out there. Some of them have you add cruciferous vegetables, like broccoli or chard. I don't recommend that, since these vegetables have a high sulfur content and can turn bitter. I also think adding mushrooms, and caramelizing the vegetables before you add the water are important components. So when I make vegetable stock, I follow this excellent method described at Simply Recipes.
After whatever stock you are making is cooled and strained, go ahead and divide it up into smaller storage containers. It will keep in the fridge for 3 days, or the freezer for up to 3 months. You can even freeze it in ice cube trays, and then transfer it to a Ziploc bag. Each ice cube is about 2 tablespoons, which means you will already have pre-measured amounts to add to sauces or other recipes as needed.
I am telling you here and now, if you do nothing else this holiday season, make your own stock. Make a big huge batch of it, and then freeze it to use through the winter. You could even pass out containers of it as Christmas presents. Your friends will love you. Well, I would love you. So make some stock this weekend. And tell me about it, I'd love to hear what kind of stock you made, how it turned out, and any questions that popped up along the way.
Monday, November 11, 2013
Thanksgiving Tour 2013 -- Day 4
![]() |
| Print This Recipe |
I have a fun and easy to make side dish for you today -- Potato "Fill-in-the-Blank" Gratin.I adapted the recipe from Williams-Sonoma's Potato and Celery Root Gratin.
The idea here is, you use a waxy potato, like yukon gold, or red-bliss, and then pick your other favorite winter vegetable to mix in.
Choose from any of the following to fill in your "blank":
Celery Root
Kohlrabi
Parsnip
Rutabaga
Sunchoke
Turnip
Cauliflower
I used whole milk instead of cream as the liquid, a trick I learned from the Smitten Kitchen. For my taste, the dish is plenty rich and savory with the milk, and then you can save the cream for your pie.
Saturday, November 9, 2013
Thanksgiving Tour -- Day 3
![]() |
| Image available at: http://tinyurl.com/mf6yos4 |
The recipe comes right from the back of the bag of Ocean Spray Cranberries and couldn't be simpler to make:
1 12 Ounce bag fresh cranberries
1 Small seedless navel orange, washed and scrubbed
1/2 to 3/4 Cup sugar (I use sucanat)
Cut the whole orange into cubes, place in a food processor with the cranberries and sugar and pulse until finely chopped. Transfer to a bowl, cover and let sit overnight. Since you are eating the entire fruit, skin and all, I prefer to use organic cranberries and oranges.
Incidentally, this also makes a great spread for turkey sandwiches.
Friday, November 8, 2013
Thanksgiving Tour 2013 -- Day 2
The way the recipe was written didn't exactly match up to my experience when making it so it seemed worthy of making a few notes:
- 6 tablespoons of butter was too much for the crust. I started over reducing the butter to 5 tablespoons with much better results.
- Reduce curry powder and fennel seeds to 1/2 teaspoon each.
- Have all ingredients at room temperature, mixtures will come together more smoothly.
Tempered egg mixture took about 10 minutes to thicken, not 2-3 as the recipe suggests.The second time I made this the mixture thickened right up in 3 minutes. I attribute this to the additional cornstarch, higher heat on the stove, and better carmel mixture to start with.- Molasses flavor was over-powering, leave the molasses out and add 1 tablespoon of whiskey instead.
- This one just begs for a delicious dessert wine.
Thursday, November 7, 2013
Thanksgiving Tour -- Day 1
![]() |
| Print This Recipe |
For our first stop on the Thanksgiving Tour, we are going to explore a recipe that would make an excellent main course for the center of your vegan Thanksgiving feast. And, later in the month I will show you how to transform these same ingredients into a delicious stuffing.
The base of this dish is nutty, earthy wild rice. Let's talk about rice for a minute. . . I can't cook rice. Well, wait a minute -- I couldn't cook rice.
When I say, I couldn't cook rice, I mean I really, really sucked at it. I was always lifting the lid, peeking into the pot, adjusting the heat up and down, and adding a little more liquid. All strategies that lead to rice frustration, rather than rice bliss.
Now I know you are probably thinking, "Geez woman, just buy a rice cooker already!" Well we don't have a huge kitchen, and I am also a minimalist (I don't have a waffle iron, either). I like to keep things simple, and aside from a toaster, my Kitchenaid and the coffee machine, we aren't big appliance people. (Not that there's anything wrong with that.)
| Image available at: http://tinyurl.com/osnh7yw |
So how did I overcome my rice cooking problem . . . The oven. Yep, the oven. Cook your rice in the oven and easy peasy, beautiful results. I learned this from my dad -- this is how he would cook the rice for the restaurant.
| Delicata Squash |
So now that I can cook rice, what will I do with it? Well, when I read this recipe for Roasted Pumpkin Salad on “101 Cookbooks” several weeks ago, I was intrigued by the idea of using sunflower seeds to make a sauce. Plus, it featured wild rice, and even better, our CSA share that week included these adorable delicata squash. The skin of these squash is tender and completely edible (the word "delicata" is translated from Italian to mean delicate and mild).
Labels:
CSA,
dairy-free,
Fall,
gluten-free,
main dish,
side dish,
Thanksgiving,
vegan,
vegetarian
Sunday, November 3, 2013
A Cup Is Not Always A Cup.
![]() |
| Flour straight out of the bag. |
![]() |
| Print This Recipe |
My favorite kitchen tool is a digital food scale. It has really changed the way I cook. My infatuation with the scale no doubt has something to do with my training as a chemist (that, and my perfectionist tendencies). I spent a lot of time measuring out reagents on a lab scale. The kitchen has now become my laboratory, and I swear, once you get used to cooking with a scale (especially baking) you will wonder how you ever lived without it. Here's why -- a cup of flour can vary dramatically in weight, depending on how it is milled, or whether it is sifted. But, 125 grams is always 125 grams.
Then I took the same flour and "aerated" it, by just gently whisking the flour in a bowl. I scooped out a cup, leveled and weighed: 128 grams! 31 grams less flour, about 20% less than the original measurement. My cup now looked more like 1 1/4 cups. If you are baking, which is all about ratios of ingredients, this is a big difference.
![]() |
| Measuring the whisked flour. |
A couple of years ago I started experimenting with gluten-free recipes. We are not a gluten-free house, however, my food ethos is variety, variety and more variety. I like to incorporate lots of different kinds of grains into our diet. Things like pancakes and muffins are great for this. They are not yeast risen and therefore don't depend on gluten for the structure of their crumb. Plus, kids love them. Sometimes I like to make a double batch on the weekend and freeze half. Then you can just pop them in the toaster when you want a quick, delicious breakfast.
Gluten-free Girl and the Chef has been a great resource for me in exploring this subject. They have a fabulous post on how to make your own gluten-free whole grain flour blend. It is super cool because you get to choose from a bunch of whole grain flours and make your own mix. Basically you weigh out 70% of a whole grain flour, and 30% of a starch. I used that formula to develop these gluten-free pumpkin pancakes.
I have tried quinoa flour, sorghum flour, almond meal, oat flour, teff and brown rice flour in different combinations throughout the years. For the starches, Cornstarch and Arrowroot have been my favorites. I tried the potato starch with less than great results. It just sucked up so much moisture that the batter became to thick. Feel free to choose your own flours to find the taste and texture combination you like best.
| Bosc pear and spices. |
You may remember me mentioning Sonoma Harvest here before, this time I used their Pear & Cinnamon Honey, to make a pear topping for these pancakes. I have to say, it turned out even more delicious than I had imagined when I was dreaming this recipe up. I am dying to try it over vanilla or hazelnut gelato.
Subscribe to:
Posts (Atom)


.jpeg)


.jpeg)
__11_1_2013_16_16_15.png)
.jpeg)