Welcome to the first ever Olive Oil, Salt & Pepper Thanksgiving Tour. Over the next three weeks we will be exploring all things Thanksgiving: food, wine, menu plans, and some culinary traditions of the holiday.
For our first stop on the Thanksgiving Tour, we are going to explore a recipe that would make an excellent main course for the center of your vegan Thanksgiving feast. And, later in the month I will show you how to transform these same ingredients into a delicious stuffing.
The base of this dish is nutty, earthy wild rice. Let's talk about rice for a minute. . . I can't cook rice. Well, wait a minute --
I couldn't cook rice.
When I say, I couldn't cook rice, I mean I
really, really sucked at it. I was always lifting the lid, peeking into the pot, adjusting the heat up and down, and adding a little more liquid.
All strategies that lead to rice frustration, rather than rice bliss.
Now I know you are probably thinking, "Geez woman, just buy a rice cooker already!" Well we don't have a huge kitchen, and I am also a minimalist (
I don't have a waffle iron, either). I like to keep things simple, and aside from a toaster, my
Kitchenaid and the coffee machine, we aren't big appliance people. (
Not that there's anything wrong with that.)
Actually, risotto is the perfect dish for me -- rice that likes lots and lots of babysitting. But that is for another post, on another day. Today, I am talking about cooking wild rice (
Zizania palustris), which, incidentally, is
not related to what we commonly refer to as "rice"(
Oryza sativa). This cooking method works like a dream for wild rice, white rice, brown rice, red rice, purple rice,
Ray Rice, and
Jerry Rice. OK, just kidding. Ray Rice can't cook to save his life.
So how did I overcome my rice cooking problem . . . The oven. Yep, the oven. Cook your rice in the oven and easy peasy, beautiful results. I learned this from my dad -- this is how he would cook the rice for the
restaurant.
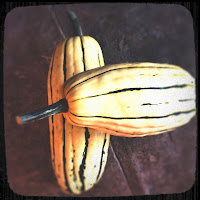 |
| Delicata Squash |
Here's what you do: in an oven safe pot with a fitted lid, bring your liquid to a boil, add rice and salt, stir, cover, pop it in a 350 degree oven, and go put your feet up for a while. (
Or if you're like me, run around and sweep the floor, make the kids lunches and start some laundry.) The oven provides a nice even heat all around the pot, and unless you get really, really distracted it is very unlikely that you will scorch the rice. How much and how long depends on what kind of rice you are making -- Martha Stewart has a nice little rice cooking reference chart
here.
So now that I can cook rice, what will I do with it? Well, when I read
this recipe for Roasted Pumpkin Salad on “101 Cookbooks” several weeks ago, I was intrigued by the idea of using sunflower seeds to make a sauce. Plus, it featured wild rice, and even better, our
CSA share that week included these adorable delicata squash. The skin of these squash is tender and completely edible (
the word "delicata" is translated from Italian to mean delicate and mild).
 I am having a hard time believing that tomorrow is Thanksgiving. It seems like a week ago that the kids were just going back to school. I am also having a hard time believing that I still have two recipes to post!
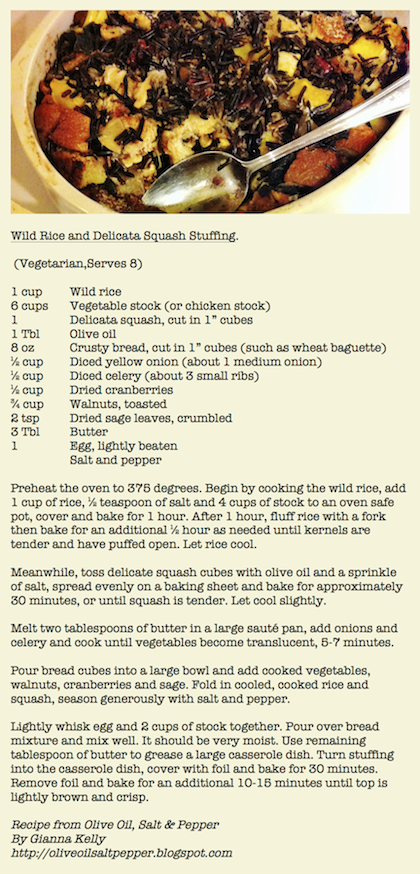
.jpeg)


.JPG)


.jpeg)
__11_1_2013_16_16_15.png)
.jpeg)

